
Cheesy Taco Sticks are a delightful culinary creation that marries the beloved flavors of traditional tacos with the comfort of melted cheese, all encased in a golden, crispy dough. This easy-to-follow recipe has quickly become a favorite for gatherings, whether it’s a lively party, an exciting game day, or a cozy family dinner. The rich and savory combination of seasoned ground beef and gooey cheese makes these sticks an irresistible treat that can serve as an appetizer, snack, or even a satisfying main dish. In this article, we will guide you through the step-by-step process of crafting these delicious cheesy taco sticks, sharing insights into the ingredients, preparation techniques, and serving suggestions that elevate this dish to must-try status for any food enthusiast.
Understanding the Ingredients
Before diving into the preparation of Cheesy Taco Sticks, it’s essential to understand the core components that contribute to their mouthwatering flavor and texture. Each ingredient plays a crucial role in bringing this dish to life, ensuring a perfect balance of taste and satisfaction.
Ground Beef
At the heart of the cheesy taco sticks is ground beef, which provides the necessary protein and flavor that forms the foundation of the filling. Choosing high-quality ground beef is key—opt for a blend with a little fat to ensure a juicy filling that won’t dry out during cooking. The beef’s flavor is further enhanced by the careful selection of spices and aromatics, making it a satisfying and hearty component of the dish.
Olive Oil
A splash of olive oil is essential for sautéing the aromatics, such as onions and garlic, which add depth and richness to the dish. The oil not only helps in cooking these ingredients evenly but also contributes a subtle flavor that enhances the overall taste of the Cheesy Taco Sticks.
Aromatics
Aromatics like onion and garlic are vital in flavor development. Sautéing these ingredients releases their natural sweetness and fragrance, which forms a delicious base for the dish. Onions add a slight crunch and sweetness, while garlic infuses a robust, savory note that elevates the flavor profile of the beef filling.
Taco Seasoning
The magic of Cheesy Taco Sticks lies in the taco seasoning—a blend of spices that gives the beef its signature taco flavor. Common ingredients in taco seasoning include cumin, paprika, chili powder, and oregano. You can use store-bought seasoning or create your own mix for a customized flavor. The key is to achieve the perfect balance of spices that enhances the beef without overpowering the cheesy goodness.
Cheese Varieties
Cheese is the star of the show in these cheesy taco sticks. A combination of cheddar and mozzarella is recommended for texture and taste. Cheddar offers a sharp, tangy flavor that pairs beautifully with the seasoned beef, while mozzarella provides a stretchy, gooey quality that makes each bite satisfying. Feel free to experiment with different cheese blends to find your perfect combination.
Pizza Dough
Choosing the right dough is crucial for the perfect crunch of your taco sticks. Store-bought pizza dough is a convenient option that works well, but you could also make your own if you’re feeling adventurous. The dough should be stretchy enough to wrap the filling securely while providing a crispy exterior once baked. The thickness of the dough can also be adjusted based on your preference for thickness in the final product.
Egg Wash
An egg wash, made by whisking together an egg with a splash of water or milk, is applied to the dough before baking. This simple mixture contributes to the final presentation, giving the taco sticks a beautiful golden-brown color and a slightly glossy finish. It also adds a bit of richness to the crust, making it even more appealing.
Garnishes and Dips
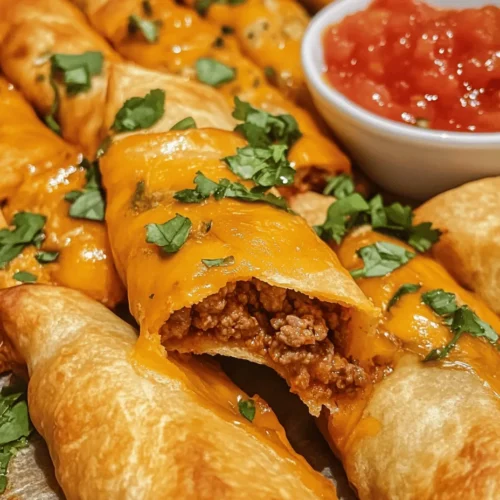
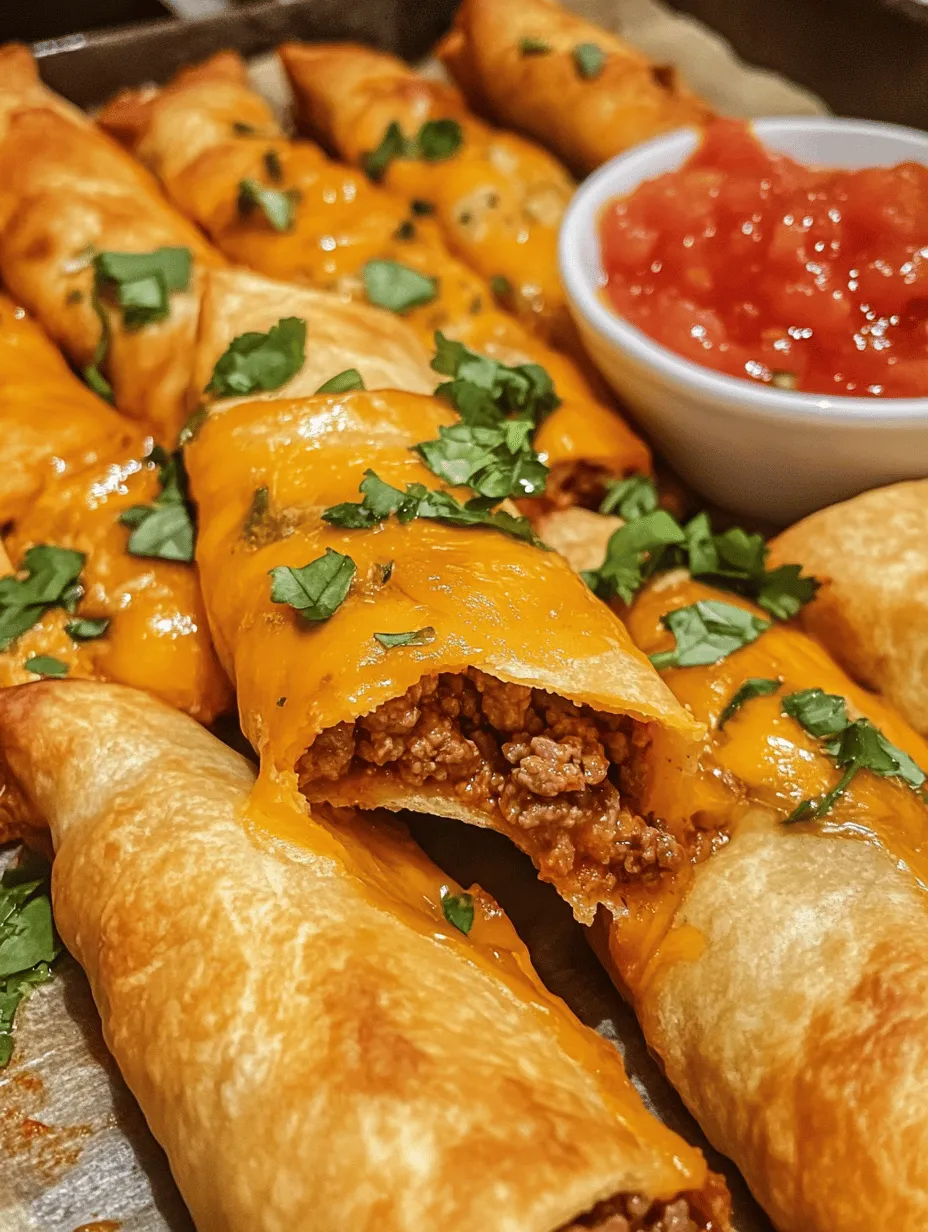
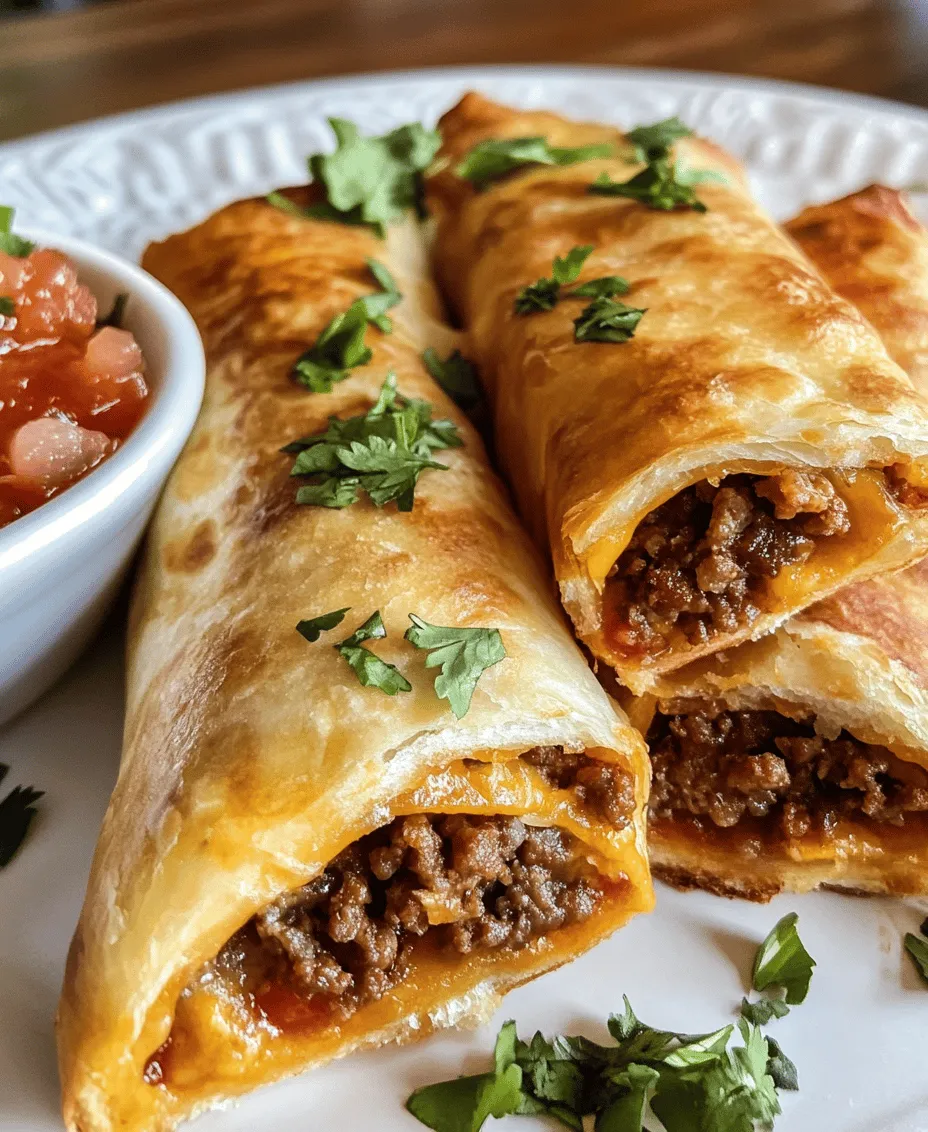
To enhance the presentation and flavor of your Cheesy Taco Sticks, consider adding garnishes and dips. Fresh cilantro adds a burst of color and a refreshing herbal note, while salsa and sour cream provide creamy and zesty dipping options. These accompaniments not only elevate the dish but also allow for customization based on individual preferences.
Step-by-Step Preparation
Now that we’ve covered the essential ingredients, it’s time to dive into the detailed preparation of Cheesy Taco Sticks. The following steps will guide you through the process, ensuring that you achieve the perfect balance of flavors and textures.
Preparing the Filling
The first step in creating your Cheesy Taco Sticks is preparing the beef filling. Start by heating a tablespoon of olive oil in a large skillet over medium heat. Once the oil is hot, add finely chopped onions to the skillet. Sauté the onions for about 3-4 minutes until they become translucent and fragrant. This initial step is essential for developing the flavors that will permeate the filling.
Next, add minced garlic to the skillet. Sauté the garlic for an additional minute, stirring continuously to prevent burning. The aroma of the garlic will fill your kitchen, signaling that it’s time to add the ground beef.
Cooking the Beef
Increase the heat to medium-high and add the ground beef to the skillet. Use a wooden spoon or spatula to break up the meat as it cooks. Browning the beef is crucial, as it not only enhances the flavor but also helps achieve the right texture. Cook the beef until it is no longer pink, about 5-7 minutes. Make sure to drain any excess fat to prevent the filling from becoming greasy.
Seasoning the Meat
Once the beef is browned, it’s time to season it for that authentic taco flavor. Sprinkle the taco seasoning over the meat and mix thoroughly, ensuring that the seasoning is evenly distributed throughout the filling. If you’re using homemade seasoning, start with about 2 tablespoons and adjust to taste. Allow the mixture to simmer for a few minutes, allowing the flavors to meld together. Taste and adjust the seasoning if necessary, adding salt or pepper as desired.
Prepping the Oven
While the filling is simmering, it’s important to prepare your oven for baking. Preheat your oven to 400°F (200°C). This temperature will ensure that the taco sticks cook evenly, resulting in a crispy exterior and a warm, gooey filling. Line a baking sheet with parchment paper or a silicone baking mat to prevent sticking and make cleanup easier.
Assembling the Taco Sticks
Once the filling is prepared and the oven is preheated, you can begin assembling your Cheesy Taco Sticks. On a clean, lightly floured surface, roll out your pizza dough into a large rectangle. Aim for a thickness of about ¼ inch—this will provide a sturdy base while still allowing for that desirable crunch.
Cut the dough into rectangles or triangles, depending on your desired shape and size for the taco sticks. Spoon a portion of the seasoned beef filling onto one side of each dough piece, and sprinkle a generous amount of shredded cheese on top. Then, fold the dough over the filling and press the edges to seal, ensuring that the cheese and beef are securely enclosed.
Once all the taco sticks are assembled, arrange them on the prepared baking sheet. Brush the tops with the egg wash to give them a beautiful, golden finish when baked.
—
With these steps complete, you are well on your way to enjoying the delectable goodness of Cheesy Taco Sticks. Stay tuned for the next part of the article, where we will cover baking, serving suggestions, and tips for the best results!
Rolling Out the Dough: Tips for Achieving the Right Thickness
To create the perfect Cheesy Taco Sticks, rolling out the dough correctly is crucial. Begin by flouring your work surface to prevent the dough from sticking. Use a rolling pin to flatten the dough to about ¼ inch thick. This thickness allows the dough to bake evenly while ensuring that it holds the filling without tearing.
As you roll, periodically lift and turn the dough to maintain an even thickness and shape. If you notice any areas that are thinner or thicker, gently push out the edges or fold them over to achieve uniformity. Remember, a well-rolled dough contributes to both texture and taste, so take your time with this step.
Cutting and Filling: How to Measure and Place the Filling Efficiently
Once your dough is rolled out, it’s time to cut it into manageable pieces and fill them. Use a sharp knife or a pizza cutter to slice the dough into rectangles, ideally measuring about 4×6 inches. This size is perfect for holding a generous amount of filling while still being easy to handle.
When it comes to filling, a little goes a long way. Place approximately 2 tablespoons of your cheesy taco filling in the center of each rectangle. Be careful not to overfill, as this can lead to messy spills during baking.
To ensure even distribution, you can create a small indentation in the center of the filling with a spoon, allowing it to nestle nicely within the dough. This technique helps in achieving a good balance of flavors in every bite.
Sealing Techniques: Various Methods for Ensuring a Tight Closure to Avoid Spills During Baking
Sealing your taco sticks properly is essential to prevent the filling from leaking during baking. There are several methods you can use for this:
1. Fork Method: After placing the filling, fold the dough over to create a pocket. Use the tines of a fork to press down the edges, sealing them tightly. This method also adds a decorative touch to your taco sticks.
2. Twist Method: For a fun presentation, twist the edges of the dough together to create a sealed pocket. Pinch the edges firmly to ensure a tight seal.
3. Water Seal: Dampen your fingers with a bit of water and run them along the edges of the dough before sealing. The moisture helps the dough adhere better, creating a strong closure.
Whichever method you choose, make sure that the edges are well-sealed to keep all that delicious filling inside.
Egg Wash Application: Techniques for a Flawless Golden Finish
An egg wash is essential for achieving that beautiful, golden-brown finish on your Cheesy Taco Sticks. To prepare, whisk one egg with a splash of water or milk in a small bowl. This mixture not only adds color but also gives your taco sticks a lovely shine.
Using a pastry brush, gently apply the egg wash over the surface of each taco stick just before they go into the oven. Be careful not to let the wash drip onto the edges, as this can create a sticky surface that may affect the seal.
For an extra touch, sprinkle a bit of coarse salt or sesame seeds on top after applying the egg wash. This not only enhances the flavor but also adds visual appeal.
Baking to Perfection
Optimal Baking Time and Temperature: Ensuring the Dough Cooks Through Without Burning
Preheat your oven to 375°F (190°C) to create the ideal baking environment for your Cheesy Taco Sticks. Carefully place the prepared sticks on a baking sheet lined with parchment paper. This prevents sticking and ensures an even bake.
Bake the taco sticks for approximately 20-25 minutes or until they are golden brown and crispy. It’s important to keep an eye on them in the last few minutes to prevent burning. Every oven is different, so if this is your first time baking these sticks, start checking for doneness around the 20-minute mark.
Signs of Doneness: Visual Cues to Look for When Your Taco Sticks are Ready
Knowing when your Cheesy Taco Sticks are done is crucial for achieving the perfect texture. Look for a rich golden color on the outside, which indicates that the dough has cooked through.
Another sign of doneness is the aroma; a delightful cheesy scent will fill your kitchen. If you gently tap the surface of a stick and it sounds hollow, it’s likely done. Allow them to cool for a few minutes on the baking sheet before serving, as they will be quite hot right out of the oven.
Serving Suggestions
Garnishing with Cilantro: Enhancing Flavor and Presentation
To elevate your Cheesy Taco Sticks, consider garnishing them with fresh cilantro. This herb adds a burst of color and a fresh, zesty flavor that complements the savory filling. Simply chop some cilantro leaves and sprinkle them over the baked sticks just before serving.
For an added touch, you can also serve the sticks alongside lime wedges. A squeeze of fresh lime over the top just before eating brightens the flavors and offers a delightful contrast to the richness of the cheese.
Dipping Options: Exploring Different Salsas and Sour Creams that Complement the Dish
One of the best parts of enjoying Cheesy Taco Sticks is the opportunity to pair them with various dips. Offer a selection of salsas—like fresh pico de gallo, spicy salsa verde, or a smoky chipotle salsa. Each of these options adds a unique flavor profile that complements the cheesy goodness of your taco sticks.
Additionally, a dollop of sour cream or Greek yogurt can provide a cool, creamy contrast to the spices in the filling. For a fun twist, you can mix in some taco seasoning or chopped jalapeños into the sour cream for an extra flavor boost.
Serving Styles: Creative Ways to Present Your Cheesy Taco Sticks at Gatherings
When it comes to presentation, creativity can go a long way. Arrange your Cheesy Taco Sticks on a large platter, perhaps with some parchment paper underneath for a rustic touch. For a more casual gathering, consider serving them in individual paper cones or small baskets lined with colorful napkins.
If you’re hosting a party, set up a taco stick bar where guests can customize their sticks with different dips and garnishes. This interactive element not only makes for a fun experience but also encourages conversation among guests.
Nutritional Information
Caloric Breakdown: Understanding the Nutritional Value Per Serving
Understanding the nutritional value of your Cheesy Taco Sticks can help you enjoy them guilt-free. Each stick typically contains about 200-250 calories, depending on the amount of cheese and filling you use.
They provide a good source of protein from the cheese and can be paired with vegetables for added nutrition. For a healthier option, consider using whole wheat dough or reducing the cheese quantity while increasing the vegetable content in the filling.
Dietary Considerations: Adaptations for Different Dietary Needs
Cheesy Taco Sticks can be easily adapted to suit various dietary needs. For those following a gluten-free diet, simply substitute regular flour with a gluten-free flour blend. Make sure to check that all your ingredients, especially the fillings, are gluten-free as well.
Vegetarians can enjoy these sticks by incorporating beans or lentils into the filling instead of meat. For a vegan option, use plant-based cheese and substitute the egg wash with a mixture of almond milk and a touch of turmeric for color.
Conclusion
Cheesy Taco Sticks offer a delightful culinary experience that combines convenience with flavor. This recipe is not only straightforward but also adaptable, making it suitable for various occasions. Whether enjoyed as a snack or served at a gathering, these taco sticks are sure to impress with their cheesy, savory filling and crispy exterior.
Embrace the joy of cooking and share this delicious dish with friends and family, creating lasting memories around the dining table. With the right preparation, filling, and presentation, your Cheesy Taco Sticks will become a beloved recipe, worthy of repeat performances in your kitchen. So gather your ingredients, roll up your sleeves, and get ready to enjoy a tasty treat that’s as fun to make as it is to eat!